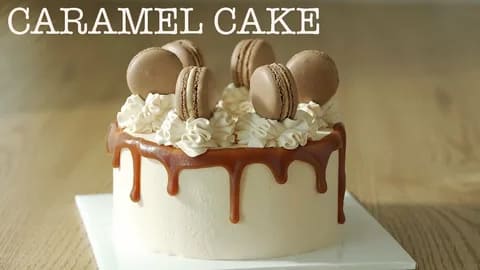
How to Make Caramel Cake: A Sweet and Simple Delight
If you’ve never had a caramel cake, I’m about to change your life. Imagine a soft, fluffy cake with a rich, sweet caramel flavour that hugs every inch of your taste buds. That’s right, we’re not talking about just any cake here; we’re talking about a cake that will have everyone asking, “Where did you get this from?” And when you answer, “Oh, I made it,” they will probably look at you with a mixture of admiration and disbelief. And rightly so.
Making caramel cake might sound fancy, but trust me, it’s not as complicated as it seems. All you need are a few basic ingredients, a bit of patience, and the courage to play with sugar (yes, sugar!). What we’re going to do here is break it down in a way that’s easy to understand, even for those who may have the baking skills of a kitchen sponge. So, let’s dive into the sweet, sticky world of caramel cake!

What Exactly is a Caramel Cake?
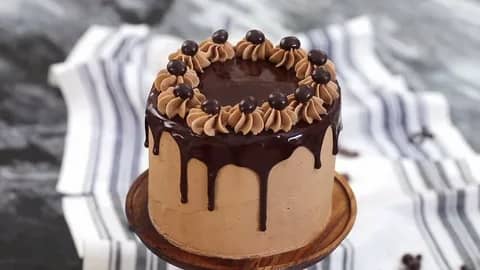
Before we get to the fun part—baking!—let’s first define what we mean by “caramel cake.” Caramel cake is a classic dessert where the flavour of caramel infuses the cake itself, and the crowning glory is the rich, gooey caramel frosting that’s as indulgent as it sounds. It’s soft, moist, and the kind of cake you’d want to make when you want to treat yourself or impress a crowd. It’s a timeless dessert, one of those old-school favourites that never goes out of style, like your favourite pair of jeans or the classic rock band that’s always playing in your head.

Ingredients You’ll Need:
Alright, let’s talk about the ingredients. Don’t worry, I promise this won’t be one of those recipes where you need a chemistry degree to understand it. We’re keeping it simple—like, “I-can-do-this-with-my-eyes-closed” simple. Here’s what you’ll need:
For the Cake:
- 2 cups of all-purpose flour (flour is the unsung hero of the cake world, holding everything together)
- 1 ½ teaspoons of baking powder (this is your cake’s personal trainer, giving it the lift it needs)
- ½ teaspoon of baking soda (another leavening agent, because who wants a flat cake?)
- ½ teaspoon of salt (just a pinch, or else we might get into “salty cake” territory, which is a different thing entirely)
- 1 cup of unsalted butter, softened (please don’t use the hard stuff straight from the fridge. It’s just not that kind of party)
- 2 cups of granulated sugar (don’t hold back, this cake deserves it)
- 4 large eggs (the fresher, the better. Eggs are like the glue that holds your cake together)
- 1 tablespoon of vanilla extract (this is what adds that ‘mmm, what’s that heavenly smell?’ vibe to your cake)
- 1 cup of buttermilk (if you don’t have buttermilk, just add a tablespoon of lemon juice to regular milk and stir. Voila!)
- ½ cup of water (because cakes need hydration too!)
For the Caramel Frosting:
- 1 cup of brown sugar (the brown sugar is the secret to that deep caramel flavour)
- ½ cup of butter, unsalted (more butter? Yes, please!)
- 1/3 cup of milk (this will help loosen things up and keep your frosting nice and spreadable)
- 1 teaspoon of vanilla extract (again, this brings a lovely warmth to the caramel)
- 1 pinch of salt (because salt and caramel are a match made in dessert heaven)
Step-by-Step Guide to Making Caramel Cake
So, now that we’ve gathered all our ingredients and set up our baking space (yes, that means clearing off the kitchen counter of all the random clutter that’s accumulated there), it’s time to get down to business.
Step 1: Prepare Your Baking Pans
Before you even think about mixing your ingredients, you need to prepare your cake pans. We don’t want any sticky situations where the cake refuses to come out of the pan. Grease the pans with a bit of butter, then dust them lightly with flour. Alternatively, you could use baking spray (because who doesn’t love a shortcut?). Make sure to tap out any excess flour so your cake doesn’t end up with a floury coating.
Step 2: Mix the Dry Ingredients
Now, grab a bowl and sift together 2 cups of flour, 1 ½ teaspoons of baking powder, ½ teaspoon of baking soda, and ½ teaspoon of salt. Yes, I know—sifting feels like an unnecessary step, but trust me, it helps your cake rise evenly and makes the texture light. Plus, sifting flour is oddly therapeutic. Just picture your flour falling like soft snow, and you’ll be fine. Set the dry ingredients aside for now, but don’t lose track of them. They’re your cake’s backbone.
Step 3: Cream the Butter and Sugar
In another, much larger bowl (preferably a mixing bowl), take your softened 1 cup of butter and 2 cups of sugar. Use an electric mixer (unless you’re feeling particularly strong today) and beat them together until the mixture becomes light and fluffy. This should take about 4-5 minutes. If you get impatient and try to rush it, your cake will be more of a brick than a light, airy delight. Trust the process, okay? It’s worth it.
Step 4: Add the Eggs, One at a Time
Now, add your 4 large eggs, one at a time. Mix after each addition until the eggs are fully incorporated. If you dump all the eggs in at once, they won’t blend well, and your cake may not rise as beautifully as you’d like. So, don’t skip the step of taking it slow. Beat the eggs in gently and give them the love they deserve. You’re building the base of a masterpiece here.
Step 5: Add the Buttermilk and Dry Ingredients
Now we’re going to alternate between adding the dry ingredients and the buttermilk. Start by adding a third of the dry ingredients into your butter-sugar-egg mixture and mix until just combined. Then, add half of the buttermilk, followed by another third of the dry ingredients, and repeat until everything is mixed in. Always finish with the dry ingredients. Don’t overmix here—just blend until the flour is incorporated. This is not the time for vigorous whisking. Be gentle. Let the batter come together at its own pace.
Step 6: Add the Water
Here’s where the magic happens: add ½ cup of water to the batter. Yes, water. It helps to loosen up the mixture and makes sure your cake isn’t too thick. Gently fold the water in until it’s evenly distributed. At this point, your cake batter should be smooth and slightly pourable. Feel free to dip your finger in and taste (just to make sure everything is going according to plan).
Step 7: Bake the Cake
Pour your batter into the prepared cake pans, dividing it evenly between the two. Now, pop those pans into the oven, which should already be preheated to 175°C (350°F). Bake for about 25-30 minutes, but keep an eye on them. When a toothpick or skewer comes out clean, it’s time to take them out. Don’t be tempted to open the oven door too early—your cake needs to rise without any interruptions, like a person trying to enjoy a peaceful nap. Once done, let them cool in the pans for about 10 minutes, then transfer them to a wire rack to cool completely. Patience, my friend, patience.
Step 8: Make the Caramel Frosting
While your cake is cooling, it’s time to make the frosting that will elevate this cake to divine levels of deliciousness. In a saucepan over medium heat, combine your 1 cup of brown sugar, ½ cup of butter, and 1/3 cup of milk. Stir constantly until the mixture comes to a gentle boil. Once it’s boiling, let it cook for another 2-3 minutes, making sure to stir to avoid burning. After that, remove the pan from the heat and add the 1 teaspoon of vanilla extract and a pinch of salt. Stir until everything is smooth and well combined. The frosting should be slightly thick, but still pourable.
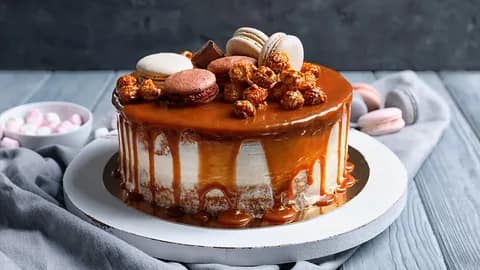
Step 9: Frost the Cake
Now comes the fun part—frosting! Once your cakes are completely cooled, place the first cake layer on a plate or cake stand. Pour a generous amount of your homemade caramel frosting on top, allowing it to drip down the sides. Then, carefully place the second cake layer on top and repeat the process. Don’t be shy with the caramel—this is a cake that deserves all the sweetness.
If you’ve got any leftover frosting (which you probably won’t, because it’s so delicious), you can drizzle it over the top or save it for later to dip some cookies in. No judgement here.
Step 10: Enjoy the Fruits of Your Labour
And there you have it—your very own caramel cake, all baked and frosted to perfection. The moment you cut into it and see that sweet caramel goodness spilling out, you’ll know that it was all worth it. Trust me, this cake is going to be a hit at any gathering, and you’ll probably get a standing ovation. If not, at least you’ll have the satisfaction of knowing you made something utterly delicious.
Final Tips:
- Storage: Store any leftover cake (if you’re lucky enough to have any) in an airtight container for up to 3 days. If you want to keep it fresh for longer, refrigerate it and let it come to room temperature before serving.
- Customise: If you want to get fancy, try adding some toasted nuts or a bit of sea salt on top of your caramel for extra texture and flavour.
- Patience is Key: Don’t rush the cooling process. Allow the cake and frosting to cool before serving for the best texture and taste.

Remarks
And that, my friends, is how you make a delicious, melt-in-your-mouth caramel cake. It’s a simple process, but the results are extraordinary. So next time you need to impress someone (or just want to treat yourself), give this recipe a try. Whether you’re a seasoned baker or a novice in the kitchen, you can do this. Just remember: when in doubt, add more caramel. It’s the key to life. Enjoy!