How to Make Blueberry Cheesecake: A Sweet Treat You Can’t Resist
If you’ve ever found yourself staring at a cheesecake in a bakery window, wondering how anyone could possibly make something so luxurious, let me assure you – it’s not as hard as it seems. You just need a few key ingredients, a bit of patience, and, most importantly, an appetite for deliciousness. But today, we’re going to turn your cheesecake dreams into reality, and not just any cheesecake – oh no, we’re talking about a Blueberry Cheesecake. This rich, creamy, sweet, and slightly tangy dessert will have you asking, “Why did I not make this sooner?”
But before we dive into the recipe, a word of warning: blueberries can be sneaky little things. They might look innocent, but they’ll be popping in your mouth faster than you can say ‘cheesecake’ once you see how good they taste in this cake. So, keep an eye on your blueberries, or they might be gone before they even make it to the cheesecake!
What You Need: The Ingredients

Before we embark on this cheesecake journey, let’s gather our heroes: the ingredients. Don’t worry – you won’t need to get out the entire spice rack or search for exotic fruit in some faraway supermarket. This is a simple recipe, with ingredients you can easily find in your local store.
For the Base:
- 200g digestive biscuits (you could go for any other plain biscuits if you’re feeling rebellious)
- 100g unsalted butter (melted, but don’t overdo it, we’re not making fondue here)
For the Cheesecake Filling:
- 900g cream cheese (full-fat for the best creamy consistency – no room for skimping here!)
- 200ml double cream (because we’re not about to settle for anything less than indulgence)
- 150g caster sugar (for that perfectly sweet, velvety texture)
- 1 tsp vanilla extract (trust me, you’ll want this for that sweet, warm flavour)
- 3 large eggs (try to get them fresh – free-range is always best!)
- 2 tbsp all-purpose flour (just a little to help set the filling)
For the Blueberry Sauce:
- 250g fresh blueberries (or frozen if fresh ones are feeling too fancy for you)
- 100g caster sugar (again, sweet is the name of the game here)
- 1 tbsp lemon juice (it’s like the superhero sidekick to your blueberries)
- 1 tbsp water (because sauce needs to flow, obviously)

Now, once you have your ingredients in front of you, it’s time to get to work. Don’t be intimidated! Making cheesecake is actually quite fun – it’s like being a dessert wizard without the robes and the wand (unless you want to add those for dramatic flair, totally your choice).
Step 1: Preparing the Base
The base of a cheesecake is like the foundation of a house. If it’s solid, the whole thing stands tall and strong. If it’s wobbly, well, you’ll have a cheesecake that’s asking for a collapse. So let’s get this right, shall we?
- Crush the biscuits: Grab a food processor or a plastic bag and a rolling pin – we’re not picky. You need those biscuits broken down into fine crumbs, like the kind that would make even your grandma proud. If you’re using a bag, just pop the biscuits in, seal it up, and take out any frustration on the biscuits with the rolling pin. (Trust me, it feels good.)
- Melt the butter: Now, melt that butter in a small saucepan over low heat, or zap it in the microwave for 30 seconds. Don’t let it turn into a bubbling butter mess; we just want it liquid, not a disaster.
- Mix the crumbs and butter: Combine the biscuit crumbs and the melted butter in a bowl. You want it to be a nice, buttery crumb mixture that sticks together when pressed. You know, like a delicious sandcastle.
- Press into a tin: Take a 9-inch springform pan and press the buttery biscuit mix firmly into the bottom. Don’t be shy – you’re creating the base of something great here. Use the back of a spoon or the bottom of a glass to smooth it out.
- Chill the base: Pop the tin into the fridge for at least 30 minutes to firm up. You can even skip this step if you’re in a rush, but let me tell you, a solid base makes the difference between a great cheesecake and a… well, a crumbly cheesecake.
Step 2: Making the Cheesecake Filling
Now for the fun part: the cheesecake filling! This part’s like making a creamy cloud, and who wouldn’t want to dive into that?
- Beat the cream cheese: In a large bowl, beat the cream cheese with an electric mixer (or just use a whisk if you’re trying to work off that cheesecake temptation). You want it smooth and lump-free, so give it a good mix until it’s silky.
- Add the sugar and vanilla: Once the cream cheese is smooth, add the sugar and vanilla extract. Keep mixing. You’re looking for a smooth, glossy texture that will make your mouth water. Do not eat it all yet, okay?
- Add the eggs: Crack in your eggs one at a time, mixing well after each addition. You’re not just beating eggs; you’re creating the magic that holds the whole cheesecake together.
- Add the flour and cream: Add the flour and double cream, and give it one last mix until smooth and luscious. Think of it like mixing the perfect potion.
- Pour the filling into the tin: Now, pour your filling over the biscuit base. Don’t just dump it in; aim for smooth, even distribution. You don’t want to break your beautiful base!
- Bake the cheesecake: Preheat the oven to 160°C (or 140°C fan). Place your cheesecake on the middle rack and bake for around 50-60 minutes. The centre should be slightly wobbly, like it’s a little shy but still presentable.
Pro Tip: If you notice the edges browning too quickly, cover the edges of your tin with some foil to stop them from getting too crisp. The goal here is a beautiful golden top.

- Cool down: Once baked, turn off the oven and leave the cheesecake in there for an hour with the door ajar. This gradual cooling helps prevent cracks. Once the hour’s up, transfer it to the fridge and chill for at least 4 hours, or overnight if you can resist. It’s hard, I know.
Step 3: Making the Blueberry Sauce
While your cheesecake is chilling, let’s prepare the blueberry sauce. This sauce is like the crown jewel on your cheesecake – shiny, sweet, and utterly divine. It takes the cheesecake to a whole new level.
- Combine the blueberries, sugar, lemon juice, and water in a saucepan over medium heat. Stir occasionally and let the berries burst open. The sugar will dissolve, and the mixture will start to thicken into a gorgeous sauce. This will take about 10-15 minutes.
- Simmer the sauce: Once the sauce is thickened, remove it from the heat and let it cool slightly. Don’t be too eager to pour it over your cheesecake yet! Let it rest, or you’ll melt the cheesecake, and we don’t want a sad puddle of cheesecake.
- Cool the sauce: Set the sauce aside to cool completely. Trust me, it’s worth the wait. When you pour this on your cheesecake, you want the sauce to gently drape over the creamy surface like a soft blanket, not a hot mess.
Step 4: Assembling the Cheesecake
Here comes the moment of glory. Your cheesecake is cool, your blueberry sauce is ready, and you’re ready to create a masterpiece.
- Release the cheesecake from the tin: Carefully remove the cheesecake from the springform pan. Do this gently, and be sure not to scratch it. Place the cheesecake on a nice serving platter.
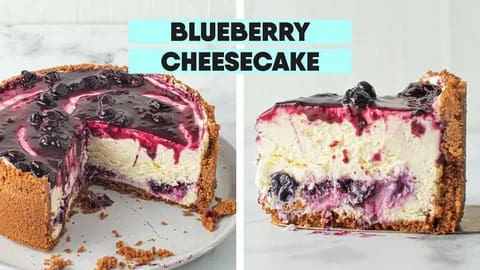
- Top with the blueberry sauce: Now, pour the cooled blueberry sauce over the cheesecake. Drizzle it generously so that every bite of cheesecake gets a bit of that fruity goodness. You can even add some fresh blueberries on top for a pop of colour and extra blueberry power.
Step 5: Serving and Enjoying
Alright, take a step back and admire your work. Look at that cheesecake – isn’t it just stunning? Now, slice it up and prepare to wow your friends, family, or even yourself. Don’t be shy – it’s not every day you get to eat something this good.
Some Fun Tips:
- Go crazy with toppings!: If you want to add a little something extra, consider topping your cheesecake with whipped cream or even a few crumbled biscuits for texture. Go ahead, get creative – it’s your cheesecake!
- Leftovers? Not likely: But in case you have any leftovers (weird flex, but okay), keep them in an airtight container in the fridge for up to 3 days. Trust me, they won’t last that long.

In Final Thought :
Blueberry cheesecake is the kind of dessert that makes people believe in magic. It’s sweet, creamy, fruity, and a little tangy – everything you could possibly want in a dessert. By following these simple steps, you’ll have yourself a cheesecake worthy of applause. It’s the kind of treat that turns any ordinary day into a special occasion, and once you make it, you’ll be the hero at any dinner party or family gathering.
So, get in the kitchen, turn on that oven, and start baking. Your taste buds – and everyone else’s – will thank you. Happy baking!

