
How to Make Angel Food Cake: A Heavenly Delight
Your Queries :-
- How to make Angel Food Cake
- Best Angel Food Cake recipe
- Light and fluffy Angel Food Cake
- Angel Food Cake from scratch
- Egg white cake recipeFluffy cake recipe
- Angel Food Cake ingredientsStep-by-step Angel Food Cake
- Easy Angel Food Cake
- Homemade Angel Food Cake
- Angel Food Cake baking tips
- Angel Food Cake with whipped cream
- Low-fat Angel Food Cake recipe
- Gluten-free Angel Food Cake
- No-fat Angel Food Cake
- Simple Angel Food Cake recipe
- How to bake Angel Food Cake
- Why Angel Food Cake is so light
- Angel Food Cake without cream of tartar
- Angel Food Cake cooling tips

If you’ve ever dreamed of tasting a slice of cake that’s as light as a cloud and as sweet as the first day of summer, then Angel Food Cake is your golden ticket. This cake isn’t just a dessert; it’s an experience. Think of it as the cake equivalent of wearing a fluffy, luxurious robe while sipping on a glass of champagne—yes, it’s that divine.
Now, you might be wondering, “How on earth do I make something so airy, so light, and so… angelic?” Well, fret not, because we’re about to take you on a step-by-step journey to creating a cake that would make the heavens themselves jealous. And don’t worry—this cake’s charm isn’t just in its taste, but also in the fun, light-hearted process of making it. Plus, we’ll make sure it doesn’t feel like a science experiment. Grab your apron, and let’s get baking!
What is Angel Food Cake?
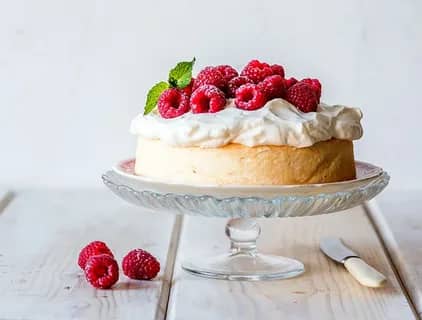
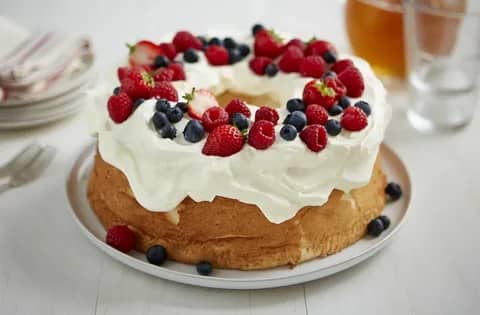
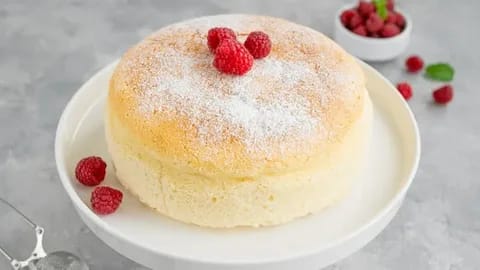
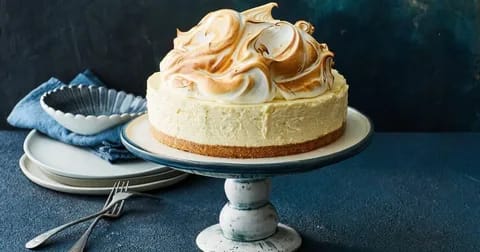
Before we get into the nitty-gritty of how to make this cake, let’s take a moment to appreciate what it actually is. An Angel Food Cake is a light, airy, and fluffy dessert made primarily from egg whites, sugar, flour, and a bit of cream of tartar. The result? A cake that is light as a feather (well, almost). It’s often served with whipped cream, berries, or even a drizzle of chocolate sauce, but truth be told, it’s so good on its own that you might find yourself eating it straight from the pan. No judgment here.
And just for fun—did you know that Angel Food Cake is called “angel food” because it was believed to be the cake of the angels? Yeah, that’s some heavenly branding. But let’s not get too philosophical; we’ve got cake to make!

What You’ll Need:
Making Angel Food Cake doesn’t require a magical set of ingredients, but you will need a few key items. Let’s go through them.
Ingredients:
- 1 cup of plain flour (not self-raising, we’re not making a surprise cake here!)
- 1 1/2 cups of caster sugar (You’ll need a bit more sugar than you think. But hey, this is angel food cake, so a little indulgence is allowed.)
- 1/4 teaspoon of salt (Just a tiny bit to balance all the sweetness, because even angels need a touch of balance.)
- 12 large egg whites (Yes, you read that right, a dozen! Don’t be afraid, egg whites are the magic behind the light texture.)
- 1 1/2 teaspoons of vanilla extract (You know, to make the angels jealous of your cake’s smell.)
- 1/2 teaspoon of cream of tartar (This is what helps the egg whites hold their shape and not turn into a sad, runny mess.)
- 1 tablespoon of lemon juice (Optional, but it adds a nice zing to your cake. Like a punch of freshness that angels would approve of.)
- A pinch of salt (Did I mention we need balance? This is just to remind us that life isn’t all sugar and fluff.)
Equipment:
- A 10-inch angel food cake pan (Don’t worry if you don’t have one with a tube in the middle, but it really does help the cake bake more evenly.)
- Hand mixer or stand mixer (You’ll need some serious muscle for whipping those egg whites into submission.)
- Sifter or fine mesh sieve (For flour—because flour clumps, and clumps are the enemy of lightness.)
- Spatula (You’ll be folding and scraping, so make sure it’s your best spatula.)
- Cooling rack (It’s important to let your cake cool upside down—this keeps it from collapsing. Yes, gravity can be cruel.)
- A measuring cup and spoons (We don’t do “eyeballing” here. Precision is key to perfection.)
Step-by-Step Recipe for Angel Food Cake
Alright, now that we’ve got everything set up, it’s time to get down to business. Let’s make this cake!
Step 1: Preheat Your Oven and Prepare the Pan
First thing’s first. Preheat your oven to 160°C (320°F). We need it nice and hot to cook this angelic creation to perfection.
Next, prepare your cake pan. Here’s a little secret: Do not grease your angel food cake pan. I know it sounds strange, but trust me. The cake needs to cling to the sides to rise properly. Greasing the pan would prevent it from climbing up to the sky, and you don’t want to stop an angel from flying, do you?
Step 2: Sift the Dry Ingredients
Now comes the sifting part. Don’t skip this step. Take your flour, salt, and half of the sugar (¾ cup) and sift them together. This is a vital step, not just for lightness, but also for making sure there are no lumpy surprises in your cake. If you don’t have a sifter, a fine mesh sieve will work just fine—you’re not trying to build a wall, just a fluffy cake.
Once everything is sifted together, set it aside. The sugar and flour are now ready for their heavenly roles.
Step 3: Whip the Egg Whites
Here’s where the magic happens. Egg whites are the stars of the show, so treat them like royalty. Take your 12 egg whites and place them in a large, clean mixing bowl. No yolk allowed—just whites. Make sure there are no traces of egg yolk in there, or your whites won’t whip properly. This is the stage where we really start to see the cake take shape.
Add the cream of tartar and the pinch of salt to the egg whites. Cream of tartar helps stabilize the whites and ensures they don’t deflate later on. If you don’t have cream of tartar, don’t panic; you can use lemon juice instead, but cream of tartar is what the angels prefer.
Now, grab your mixer and start whipping those egg whites on a low speed. Gradually increase the speed to medium-high as the egg whites begin to foam. You’ll start to see soft peaks form, like little clouds forming in the sky. Keep going until you see stiff peaks. This should take about 5-7 minutes, depending on your mixer.
Pro tip: If you’re not sure what stiff peaks look like, think of the texture of a soft mountain that won’t fall over. It should hold its shape but not be dry or over-beaten.

Step 4: Add the Sugar
Once your egg whites are at their fluffy best, it’s time to add the sugar. Gradually add the remaining 3/4 cup of sugar—a tablespoon at a time—while continuing to beat the whites. This is important because adding the sugar too quickly can deflate your lovely peaks. Take it slow and steady, like you’re trying to get a kitten to trust you.
Once all the sugar is incorporated, add the vanilla extract and beat for another 30 seconds. You should now have a bowl of shiny, stiff, and glorious egg whites. It’s like you’ve captured a cloud and made it edible.
Step 5: Fold in the Dry Ingredients
Now, take a deep breath because we’re about to combine the two mixtures. Carefully fold in the sifted dry ingredients into the whipped egg whites. Use a spatula and work gently—this is the delicate part. You don’t want to deflate all the air you just whipped into the egg whites.
Fold the mixture until it’s just combined—no more. Over-mixing is like trying to put toothpaste back in the tube. It’s not going to work, and your cake might end up dense and sad.
Step 6: Pour into the Pan
Once your batter is light, airy, and beautifully combined, it’s time to pour it into the pan. Gently spoon the batter into the prepared angel food cake pan. Don’t tap or shake it—just smooth the top with your spatula. You don’t want to disturb the angels.
Step 7: Bake to Perfection
Pop your cake into the oven and bake for about 35-40 minutes, or until the top is golden brown and a skewer inserted into the centre comes out clean. You’ll know it’s ready when it smells like sweet success.

Step 8: Let the Cake Cool Upside Down
Here’s where it gets a little quirky—cool your cake upside down. That’s right. When you take the cake out of the oven, immediately invert it onto a cooling rack. This allows the cake to cool evenly and prevents it from collapsing under its own weight.
Pro tip: If your cake pan has feet, great! If not, you can balance the pan on the neck of a bottle (a bottle of wine, perhaps?). It’s an angelic balancing act.
Step 9: Removing the Cake
After your cake has cooled completely (about 1-2 hours), it’s time to remove it from the pan. Run a knife around the edges to loosen it, then gently remove the cake from the pan. Be careful—it might try to stick to the sides, but you’re smarter than that.
Serving Your Angel Food Cake
Once you’ve freed the cake from its pan, it’s ready to serve. You can enjoy it as-is, or top it with whipped cream, fresh berries, or a drizzle
of chocolate sauce. If you’re feeling fancy, you could dust it with some powdered sugar and pretend you’re at a royal tea party. The possibilities are endless!

Final Thoughts:
Making Angel Food Cake might seem like a bit of a delicate operation, but with the right patience and a sprinkle of love, you’ll end up with a cake that is truly heavenly. And let’s be honest—if you can make something this light and fluffy, you deserve to feel like you’ve got the baking skills of an angel.
So, whether you’re making it for a special occasion, a casual get-together, or just because you wanted to taste what heaven feels like in cake form, this recipe will take you there. Trust us, your tastebuds will be thanking you. And hey, if the angels are listening—they’ll be jealous of your baking prowess!
Enjoy, and don’t forget to share. After all, even angels like a slice of cake.
#AngelFoodCake#Baking#CakeRecipes#HomemadeCake#DessertTime#FluffyCake#BakingFromScratch#SweetTreats#BakeItTillYouMakeIt#CakeLovers#DessertLovers#Foodie#BakingJoy#InstaCake#Foodstagram#CakeOfTheDay#BakeAndShare#FreshBakes#BakingTips#SweetDelights


Thank You Very Much. Stay With Us and Share Plz.